Monday, 27 October 2014

3.What is the role of VMware vCenter server?
  • vCenter provides a centralized management platform and framework for all ESXi hosts and their respective VMs. vCenter  server allows IT administrators to deploy, manage, monitor, automate, and secure a virtual infrastructure in a centralized fashion. To help provide scalability , vCenter Server leverages a back-end database (Microsoft SQL Server and Oracle are both supported, among others) that stores all the data about the hosts and VMs.


VMotion Process

The state information includes the current memory content and all the information that defines and
identifies the virtual machine. The memory content includes transaction data and the bits of the operatingsystem and applications that are in the memory. The defining and identification information stored in thestate includes all the data that maps to the virtual machine hardware elements, such as BIOS, devices, CPU,MAC addresses for the Ethernet cards, chip set states, registers, and so forth.

When you migrate a virtual machine with vMotion, the new host for the virtual machine must meet
compatibility requirements so that the migration can proceed.

Migration with vMotion occurs in three stages:

1 When the migration with vMotion is requested, vCenter Server verifies that the existing virtual
machine is in a stable state with its current host.
2 The virtual machine state information (memory, registers, and network connections) is copied to thetarget host.
3 The virtual machine resumes its activities on the new host.
If errors occur during migration, the virtual machine reverts to its original state and location.

Friday, 17 October 2014

Dell VMware Virtual SAN

Shared storage is basically a set of storage devices that are connected to and used by two or more systems. The most commonly used term in IT departments for this shared storage is SAN (Storage area network). Typically a storage area network is part of the overall network of computing resources for an enterprise and it would contain separate storage units connected to the ESXi host(s) via Fibre Channel, iSCSI or configured as a NFS. In a VMware ESXi environment the storage is divided into volumes and some or all of these volumes are then presented to ESXi hosts simultaneously. The VMware administrator can then decide hether to create VMFS data stores on these volumes or present them as raw device mappings to individual virtual machines. Typically the storage devices come with their own configuration, administration and/or monitor software that can be used in addition to VMware tools already available in a VMware virtual environment.


VMware Virtual SAN is a new feature from VMware that allows you to create a clustered data store from the storage (SSD and HDD drives) that is present in the ESXi hosts. The Virtual SAN storage cluster must be made up of at least three ESXi servers. VMware Virtual SAN is built into the ESXi 5.5 hypervisor and can be used with ESXi hosts that are configured with PERC RAID controllers or with LSI adapters. To be able to use Virtual SAN, you will need at least one SSD and one HDD in each of the servers participating in the Virtual SAN cluster and it’s important to note that the SSD doesn’t contribute to the storage capacity. The SSDs are used for read cache and write buffering whereas the HDD’s are there to offer persistent storage.

Virtual SAN is highly available as it’s based on the distributed object-based RAIN (redundant array of independent nodes) architecture. Virtual SAN is fully integrated with vSphere. It aims to simplify storage placement decisions for vSphere administrators and its goal is to provide both high availability as well as scale out storage functionality.

VMware Virtual SAN offers an easy to configure, highly redundant, high performance storage system without the need to purchase any additional hardware. Performance should mimic single hop iSCSI with very high throughput and no bottlenecks.

To read an indepth analysis of VMware Virtual SAN with Dell hardware please follow this link

Installing VMWare Tools into a Linux VM

Just a very quick post to help a customer on installing VMWare Tools into a Linux OS. Not something I tend to get to do too often, so hope these steps help. If anyone has any tips to add then feel free to email me at vmskills@gmail.com and I'll post them for you. I found this in an document I downloaded, can't remember the source. Thanks Andrew


Installing VMware Tools within x
You can install VMware Tools within x using the .tar installer in a terminal window.


To install VMware Tools from X with the RPM installer:

1. Choose VM > Install VMware Tools.
The guest operating system mounts the VMware Tools installation virtual CD.
2. Double-click the VMware Tools CD icon on the desktop.
Note: In some Linux distributions, the VMware Tools CD icon may fail to appear when you install VMware Tools within an X windows session on a guest. In this case, you should continue installing VMware Tools as described in Installing VMware Tools from the Command Line with the Tar Installer, beginning with step 3.
3. Double-click the RPM installer in the root of the CD-ROM.
4. Enter the root password.
5. Click Continue.
The installer prepares the packages.
6. Click Continue when the installer presents a dialog box saying Completed System Preparation. A dialog appears for Updating system, with a progress bar. When the installer is done, VMware Tools are installed. There is no confirmation or finish button.
7. In an X terminal, as root (su -), configure VMware Tools.
vmware-config-tools.pl 
Respond to the questions the installer displays on the screen. Press Enter to accept the default value.
Note: Be sure to respond yes when the installer offers to run the configuration program.
8. Launch the VMware Tools background application:
vmware-toolbox &
Note: Some guest operating systems require a reboot for full functionality.


Installing VMware Tools from the Command Line with the Tar Installer

The first steps are performed on the host, within Workstation menus:
1. Power on the virtual machine.
2. After the guest operating system has started, prepare your virtual machine to install VMware Tools.
Choose VM > Install VMware Tools.
The remaining steps take place inside the virtual machine.
3. As root (su -), mount the VMware Tools virtual CD-ROM image, change to a working directory (for example, /tmp), uncompress the installer, then unmount the CD-ROM image.
Note: Some Linux distributions automatically mount CD-ROMs. If your distribution uses automounting, do not use the mount and umount commands below. You still must untar the VMware Tools installer to /tmp.
Some Linux distributions use different device names or organize the /dev directory differently. If your CD-ROM drive is not /dev/cdrom or if the mount point for a CD-ROM is not /mnt/cdrom, you must modify the following commands to reflect the conventions used by your distribution.
mount /dev/cdrom /mnt/cdrom
cd /tmp
Note: If you have a previous installation, delete the previous vmware-distrib directory before installing. The default location of this directory is
/tmp/vmware-tools-distrib.
4. Untar the VMware Tools tar file:
tar zxf /mnt/cdrom/VMwareTools-5.0.0-.tar.gz
umount /dev/cdrom
Where is the build/revision number of the VMware Workstation release.
Note: If you attempt to install a tar installation over an rpm installation — or the reverse — the installer detects the previous installation and must convert the installer database format before continuing.
5. Run the .tar VMware Tools installer:
cd vmware-tools-distrib
./vmware-install.pl
Respond to the configuration questions on the screen. Press Enter to accept the default value.
6. Log off of the root account.
exit
7. Start X and your graphical environment.
8. In an X terminal, launch the VMware Tools background application.
vmware-toolbox &
Note: You may run VMware Tools as root or as a normal user. To shrink virtual disks, you must run VMware Tools as root (su -).
Installing VMware Tools from the Command Line with the RPM Installer
The first steps are performed on the host, within Workstation menus:
1. Power on the virtual machine.
2. After the guest operating system has started, prepare your virtual machine to install VMware Tools.
Choose VM > Install VMware Tools.
The remaining steps take place inside the virtual machine.
3. As root (su -), mount the VMware Tools virtual CD-ROM image, change to a working directory (for example, /tmp), uncompress the installer, then unmount the CD-ROM image.
Note: Some Linux distributions automatically mount CD-ROMs. If your distribution uses automounting, do not use the mount and umount commands below. You still must untar the VMware Tools installer to /tmp.
Some Linux distributions use different device names or organize the /dev directory differently. If your CD-ROM drive is not /dev/cdrom or if the mount point for a CD-ROM is not /mnt/cdrom, you must modify the following commands to reflect the conventions used by your distribution.
mount /dev/cdrom /mnt/cdrom
cd /tmp
Note: If you have a previous installation, delete the previous vmware-distrib directory before installing. The default location of this directory is
/tmp/vmware-tools-distrib.
4. At the command prompt, enter:
rpm -Uhv /mnt/cdrom/VMwareTools-5.0.0-.i386.rpm
umount /dev/cdrom
Where is the build/revision number of the VMware Workstation release.
Note: If you attempt to install an rpm installation over a tar installation — or the reverse — the installer detects the previous installation and must convert the installer database format before continuing.
5. Configure VMware Tools:
vmware-config-tools.pl
Respond to the questions the installer displays on the screen. Press Enter to accept the default value.
6. Log off of the root account.
exit
7. Start X and your graphical environment.
8. In an X terminal, launch the VMware Tools background application.
vmware-toolbox &
Note: You may run VMware Tools as root or as a normal user. To shrink virtual disks, you must run VMware Tools as root (su -).
Starting VMware Tools Automatically
You may find it helpful to configure your guest operating system so VMware Tools starts when you start your X server. The steps for doing so vary depending on your Linux distribution and your desktop environment. Check your operating system documentation for the appropriate steps to take.
For example, in a Red Hat Linux 7.1 guest using GNOME, follow these steps.
1. Open the Startup Programs panel in the GNOME Control Center.
Main Menu (click the foot icon in the lower left corner of the screen) > Programs > Settings > Session > Startup Programs
2. Click Add.
3. In the Startup Command field, enter vmware-toolbox.
4. Click OK, click OK again, then close the GNOME Control Center.
The next time you start X, VMware Tools starts automatically.
Uninstalling VMware Tools
To remove VMware Tools from your Linux guest operating system, log on as root (su -) and enter the following command:
• From a tar install
vmware-uninstall-tools.pl
• From an RPM install
rpm -e VMwareTools

Recreating a missing virtual disk (VMDK) header/descriptor file

Another easily fixed issue for a VM is if you have a lost or corrupted header file for the virtual disk of a VM. When this happens the virtual disk won't be accessible. Typical senarios include

  • The virtual machine disk is missing when viewing the virtual machine folder from a datastore browser
  • You can see the –flat.vmdk file does exist when connected to the host via command line
  • The .vmdk descriptor file for the virtual machines disk does not exist or is corrupted
  • When powering on a virtual machine you see a File not found error
The disk drives of a virtual machine are represented by a pair of .vmdk files. One is a small text file, containing descriptive data about the virtual hard disk. The second is the actual contents of that disk, and is usually the same size as the drive, unless thin provisioned.

For example, a 10GB disk has a 10GB .vmdk file. These content files have -flat appended to the name of the virtual machine, like virtualDisk-flat.vmdk. The descriptive file of this set is virtualDisk.vmdk.
So to resolve this problem:

1. Identify the size of the -flat file.
2. Create a new blank virtual disk that is the same size as the original. Note: This step is critical to assure proper disk geometry.
3. Rename the descriptor of the new disk to match the name of the original virtual disk.
4. Edit the descriptor to change the reference to the -flat file.
5. Remove the leftover temporary -flat file as it is not needed.
The steps in detail are as follows:


1. Log in to the console of the ESX host.
2. Run this command to go to the directory that contains the virtual disk with the missing header/descriptor file:
cd /vmfs/volumes/myvmfsvolume/mydir
Note: If you are using ESXi, you can move, copy, change and delete directories and files using the vSphere client datastore browser, or the vifs utility which comes with the vSphere CLI. For more information, see the Performing File System Operations with vifs section of the vSphere CLI documentation.
3. Identify the kind of SCSI controller the virtual disk is using. You can do this by examining the virtual machine configuration file ( .vmx). The controller is identified by the line scsi#.virtualDev, where # is the controller number. There can be more than one controller attached to the virtual machine so make sure to identify which controller the disk you are working on is attached to.
This example uses lsilogic:
scsi0.present = "true"scsi0.sharedBus = "none"scsi1.present = "true"scsi1.sharedBus = "virtual"scsi1.virtualDev = "lsilogic"
Note: If you are using ESXi, you can download, view, edit and upload files using the vSphere Client datastore browser or the vifs utility which comes with the vSphere API. The file can be viewed or edited using your preferred text editor. For more information, see the Performing File System Operations with vifs section of the vSphere CLI documentation.

4. Run this command to identify and record the exact size of the flat file:
# ls -l vmdisk0-flat.vmdk
-rw------- 1 root root 4294967296 Oct 11 12:30 vmdisk0-flat.vmdk

5. Run the vmkfstools command to create a new virtual disk.
# vmkfstools -c 4294967296 -a lsilogic temp.vmdk
This command uses the following flags:
-c (This is the size of the virtual disk.)
-a (Whether the virtual disk was configured to work with BusLogic or LSILogic.)
If you are short on disk space, you can create the temporary disk as type thin. The associated -flat file consumes almost no space (1Mb) instead of the amount specified with -c (as we are not keeping the new -flat file, this is not a problem). The consequence is that the header file will contain an extra line that must be removed manually. The command looks like this:
# vmkfstools -c 4294967296 -d thin -a lsilogic temp.vmdk
The files temp.vmdk and temp-flat.vmdk are created as a result.
Note: If you are using ESXi, you can run the vmkfstools utility remotely using the vSphere CLI. For more information, see the vmkfstools Command Syntax section of the vSphere CLI documentation.
6. Delete temp-flat.vmdk as it is not needed. Run the command:
# rm temp-flat.vmdk
7. Rename temp.vmdk to the name that is required to match the orphaned -flat file ( vmdisk0.vmdk in this example):
# mv temp.vmdk vmdisk0.vmdk
8. Edit the descriptor file with a text editor:

Find the line with RW ####### VMFS and change the name of the -flat to match the orphaned -flat file you have.
RW 8388608 VMFS "vmdisk0-flat.vmdk"

Find the line with ddb.thinProvisioned (if -d thin was used and the original was not a thin disk) and remove it:
ddb.thinProvisioned = "1"
The virtual machine is now ready for power on.
Note: If you are using ESXi, you can download, view, edit and upload files using the vSphere Client datastore browser or the vifs utility which comes with the vSphere API. The file can be edited using your preferred text editor. For more information about the usage of the vifs utility, see the vSphere CLI documentation.

Again this information was original taken from a KB article or forum discussion which I have saved to a my own documentation.

How to Change VMware vCenter Update Manager Database Password?

In this post, I am going to explain you with the step by step procedure to change the Update Manager Database password using Update Manager utility. Let’s identify the situation where you really need to change the Update Manager database password. Let’s say you are in the process of upgrading your vSphere, You have upgraded your vCenter Server and next step is to upgrade the Update Manager. When you are upgrading the Update Manager, you need to provide the Update Manager database password in the upgrade wizard. Let’s assume, you don’t remember the Update Manager database user password. Then, you may be endup with quitting your Update Manager upgrade process. As an alternate way, You can ask your Database administrator to reset the password of the Update Manager database. Ohh, It is done and you have received the password from Database administrator. If you directly enter that password in Update Manager upgrade wizard , it will not detect the new password. Before you proceed with the Upgrade, You need to update the Database password using Update Manager utility.

Procedure to Change the Update Manager Database password

1.Browse towards the Update Manager installation directory.
<InstalltionDirectory:>\Program Files (x86)\VMware\Infrastructure\Update Manager\
2. Double click on VMwareUpdateManagerUtility.exe
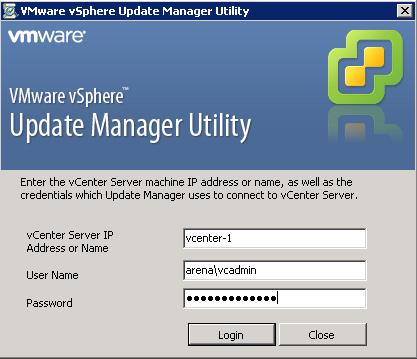
3. Login to the utility using the account with administrator privileges on vCenter Server
Update Manager utility -1 -vmwarearena
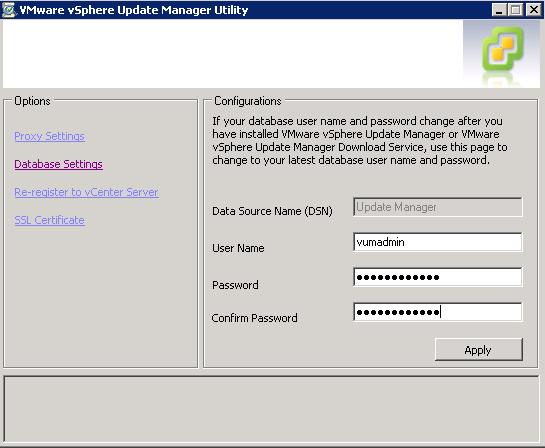
4. Click on Database Settings and type the Database username and modified database password in the field.
Update Manager utility -3 -vmwarearena
5. Click on Apply and exit from the Update Manager utility
6. Restart the VMware vCenter Update Manager service. You must restart the Update Manager Service for the changes to take effect.
Thats it. Modified Update Manager Database password will be updated after the srevice restart and you can proceed with your Upgrade process now. I hope this is informative for you. Thanks for Reading!. Be Social and share it in social media, if you feel worth sharing it.

Thursday, 16 October 2014

Shrink Virtual Machine VMDK

We got a request to reduce the allocated size of Thick provisioned Virtual machines hard disk. Increasing the VMDK size can be done in GUI but decreasing the size of VMDK is not allowed. In most cases, For virtual machine hard disk shrink can be performed via v2v. It is the safest method to reduce the virtual machine VMDK size but there is an another simple approach which saves lot of efforts rather than performing v2v. The below approach is tested in Windows 2008 Operating systems but it may corrupt your data so i would strongly suggest prepare a back out plan before perform the disk shrink. One more note to perform the disk shrink is perform a shrink operation from the OS side using shrink feature in windows 2008 and then follow the below procedure.
1. Navigate to Virtual Machine path from your ESX SSH session
            cd /vmfs/volumes/Datastore_name/VM_Name
2. Edit the VM_Name.vmdk file using Nano or vi editor
   Below is the content of  .vmdk file.

Let us understand what it is and how do we understand disk size. In the above screenshot, Size of the disk shows 83886080. How it is calculated. It is nothing but 40 GB.
40 GB = 40*1024*1024*1024/512  =  83886080
The below GUI snap confirms that VM has 40 GB assigned vmdk..
Lets say for 50 GB = 50*1024*1024*1024/512 = 104857600

To shrink the disk , Edit the descriptor file by vi VM_Name.vmdk ie. vi test.vmdk
Under extent description replace value between RW _ _ _ _ _ VMFS *-flat.vmdk. In my case it was 40GB disk assigned and hence the value was 83886080. I want to reduce the vmdk by 10 GB so after the shrink vmdk size should be 30GB.
So for 30 GB, use the below mentioned calculation
30(1024*1024*1024)/512 = 62914560  and save the file. svmotion the vm to forth and back then VM properties now reflect the new size of the disk 30 GB


Moving ESX Hosts between Clusters

This post tells you the different ways to move the ESX host between the clusters .There are 2 different ways to move the ESX hosts between the clusters.
Method 1: Move ESX Host from cluster by placing the host in maintenance Mode
1. Login to the vCenter server. When you try to Move the host between cluster or try to remove the host from cluster, you will get the below error.

2. Place the ESX host in Maintenance Mode and Click OK to migrate virtual machine out of host or Migrate the VM’s manually before placing host into maintenance mode


3.Drag and Drop the ESX host from the cluster 1 to cluster 2
Method 2 : Move ESX host from cluster without Placing into Maintenance Mode
1.  Login to the vCenter server
2. Right Click the ESX host and Disconnect ESX host from VC


3. Remove the ESX host from VC temporarily. Logout and connect back to VC, if you face any hang in VC


4.Re-add the host in the new cluster

Resizing VMDK size using Vmkfstools

This post explains about the step by step procedure to expand the virtual machine VMDK size using vmkfstools. Prior ESX 3.5, There is no option to extend the virtual hard disk size from vSphere client. Virtual harddsik expansion can be done only via CLI with the help ofvmkfstools command and also you need to power down the virtual machine before proceeding with the below steps prior ESX 3.5.
Log in to the ESX using SSH with the root credentials.
Before proceeding with the expansion step . Let’s take a look at my virtual machine “winxp-arena” has hard disk with the provisioned size of 14 GB
Browse towards the location of VMDK file of the particular virtual machine.In my case, /vmfs/volumes/datastore1/winxp-arena
Type ls -l to see the list of files located on the virtual machine folder and note down thevmdk name “winxp-arena.vmdk
I am going to expand my virtual machine vmdk  winxp-arena.vmdk”  from 14 GB to 20 GBi.e increasing 6 GB of additional hardisk space. Execute the below command
vmkfstools -X  20G /vmfs/volumes/datastore1/winxp-arena/winxp-arena.vmdk
Let’s check the VMDK file size by browsing the virtual machine directory and type ls -l. Note the size of VMDK size is expanded to 20 GB and disk size appearing above in bytes


Troubleshooting VMWare HA -Cannot complete the HA Configuration

What the basic troubleshooting steps in case of HA agent install failed on hosts in HA cluster?

If you are facing any issues related to hosts in  the HA cluster , I would recommend to follow the  below basic 10 troubleshooting steps. Most of the time, This will resolve the issues.
Error message will be similar to the below one
1. Check your environment, if any temporary network problem exists
2. Check the DNS is configured properly
3. Check the vmware HA agent status in ESX host by using below commands
  service vmware-aam status
4. Check the  ESX networks are properly configured  and named exactly as other hosts in the cluster.              otherwise, you will get the below errors while installing or reconfiguring HA agent.
5. Check HA related ports are open in firewall to allow for the communication
   
 
     Incoming port: TCP/UDP 8042-8045
     Outgoing port: TCP/UDP 2050-2250
6. Try to restart /stop/start the vmware HA agent on the affected host using the below commands.
In addition, u can also try to restart vpxa and management agent in the Host.
service vmware-aam restart
service vmware-aam stop
service vmware-aam start
7. Right Click the affected host and click on “Reconfigure for VMWare HA” to re-install the HA agent that particular host.
8. Remove the affected host from the cluster. Removing ESX host from the cluster will not be allowed untill that host is put into maintenance mode.
9.Alternative solution for 8 step is, Goto cluster settings and uncheck the vmware HA to turnoff the HA in that cluster and re-enable the vmware HA to get the agent installed from the scratch.

10. For further troubleshooting , review the HA logs under /Var/log/vmware/aam directory.