Friday, 26 December 2014

Access VMWare VMDK virtual disk from Windows

This simple post is going to explain you the procedure to mount your VMware VMDK virtual disk as windows drive. This may be needed incase if you want to access your VMware Virtual Machine files from your windows machine or to transfer some files from windows machine to your virtual machine or vice versa. To achieve this , you must have one of VMware products like VMware Workstation or Player installed on your windows machine. Let’s jump in to the procedure to mount your VMware VMDK virtual disk in your windows machine. Usually, VMware Virtual disks are in .VMDK file format. It will be located on the same directory, where you virtual machines files are stored. There are 2 different ways to mount your VMDK virtual disk into windows machine. Let’s discuss both methods in this post.

Method 1:
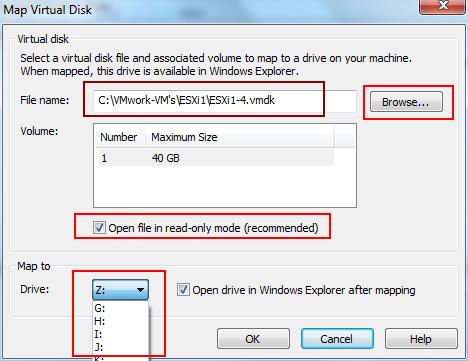
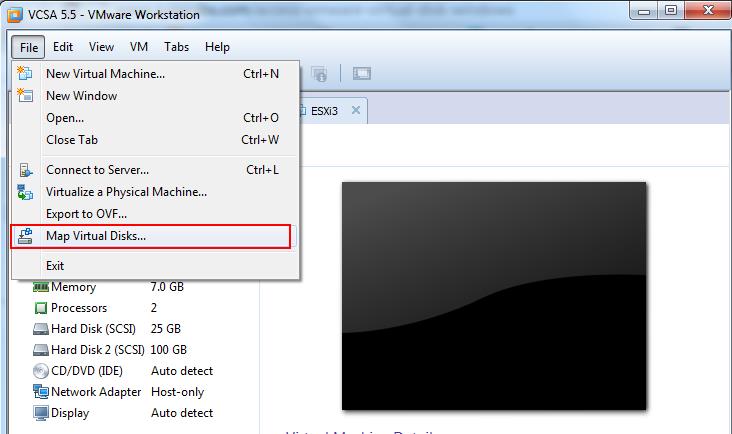
Open your VMware Workstation, and Click on File and Select Map Virtual Disks
VMDK Disk-Mapping Window machine-1
Click on Browse and browse towards the location of your VMDK virtual disk file and verify the volume size. It is always recommended  to open the file in read-only mode to avoid unnecessary data loss or drive corruption. Select the Drive Letter from the drop down by your choice and click on OK. That;s it your VMDK will be mounted on your Windows Machine with the drive letter specified.
VMDK Disk-Mapping Window machine-2That’s it. you can access the VMDK virtual disk from your windows explorer.
Method 2
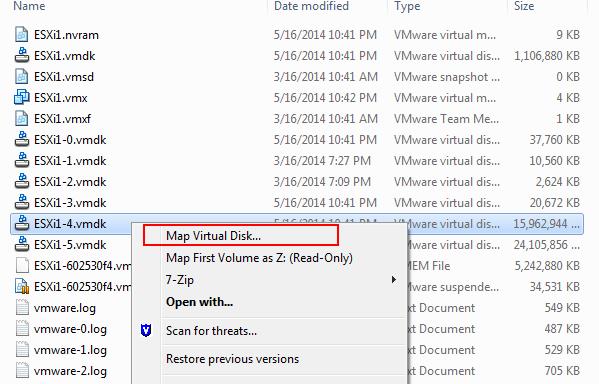
You can browse directly the location VMDK files and right-click on the VMDk file which you want to mount in windows machine and select Map Virtual Disk and Select the VMDK to mount.
VMDK Disk-Mapping Window machine-3

VMware vSphere 5.5 Update 2 Released !!!

On 9 th September, VMware Released vSphere 5.5 Update 2. It always a Questions in everyone’s mind about What’s New  in the Update  Release or in newer version  of vSphere release. This post is going to give you with the details about What’s new in VMware vSpher 5.5 Update 2.  There are few feature addition along with 100+ bug fixes from the previous version.

What’s New in VMware ESXi 5.5 Update 2?

  • Support for hosts with 6TB of RAM – vSphere 5.5 Update 2 starts to support hosts with 6TB of RAM.
  • VMware vShield Endpoint Thin Agent is renamed as VMware Tools Guest Introspection plugin – The vShield Endpoint driver bundled with VMware Tools is now called Guest Introspection.
  • Resolved Issues: Take a look at the list of  Resolved issues  with the release of  VMware ESXi 5.5 Update 2

What’s New in VMware vCenter 5.5 Update 2?

  • vCenter Server database support: vCenter Server now supports the following external databases:   Oracle 12c. (Important: For pre-requisite requirements, see KB 2079443),  Microsoft SQL Server 2012 Service Pack 1  &  Microsoft SQL Server 2014
  • vCloud Hybrid Service: The vCloud Hybrid Service (vCHS) introduces a new container, Hybrid Cloud Service, on the vSphere Web Client home page. The Hybrid Cloud Service container contains the vCHS installer and the new vCloud Connector installer.
  • Customer Experience Improvement Program: The vSphere customer experience improvement program is introduced to collect configuration data for vSphere and transmit weekly to VMware for analysis in understanding the usage and improving the product.
  • Resolved Issues: Take a look at the list of Resolved issues  with the release of VMware vCenter 5.5 Update 2

Product Support Notices

  • vSphere Web Client: Starting with vSphere 5.5 Update 2, Windows XP and Windows Vista are not supported as vSphere Client Operating System. You can find the complete list of operating system supported by vSphere Web Client in the VMware Compatibility Guide.
  • vSphere Web Client: Because Linux platforms are no longer supported by Adobe Flash, vSphere Web Client is not supported on the Linux OS. Third party browsers that add support for Adobe Flash on the Linux desktop OS might continue to function.
  • VMware vCenter Server Appliance: In vSphere 5.5, the VMware vCenter Server Appliance meets high-governance compliance standards through the enforcement of the DISA Security Technical Information Guidelines (STIG). Before you deploy VMware vCenter Server Appliance, see the VMware Hardened Virtual Appliance Operations Guide for information about the new security deployment standards and to ensure successful operations.
  • vCenter Server database: vSphere 5.5 removes support for IBM DB2 as the vCenter Server database.
  • VMware Tools: Beginning with vSphere 5.5, all information about how to install and configure VMware Tools in vSphere is merged with the other vSphere documentation. For information about using VMware Tools in vSphere, see the vSphere documentation. Installing and Configuring VMware Tools is not relevant to vSphere 5.5 and later.
  • vSphere Data Protection: vSphere Data Protection 5.1 is not compatible with vSphere 5.5 because of a change in the way vSphere Web Client operates. vSphere Data Protection 5.1 users who upgrade to vSphere 5.5 must also update vSphere Data Protection to continue using vSphere Data Protection.

Keyboard Shortcuts of VMware vSphere Web Client

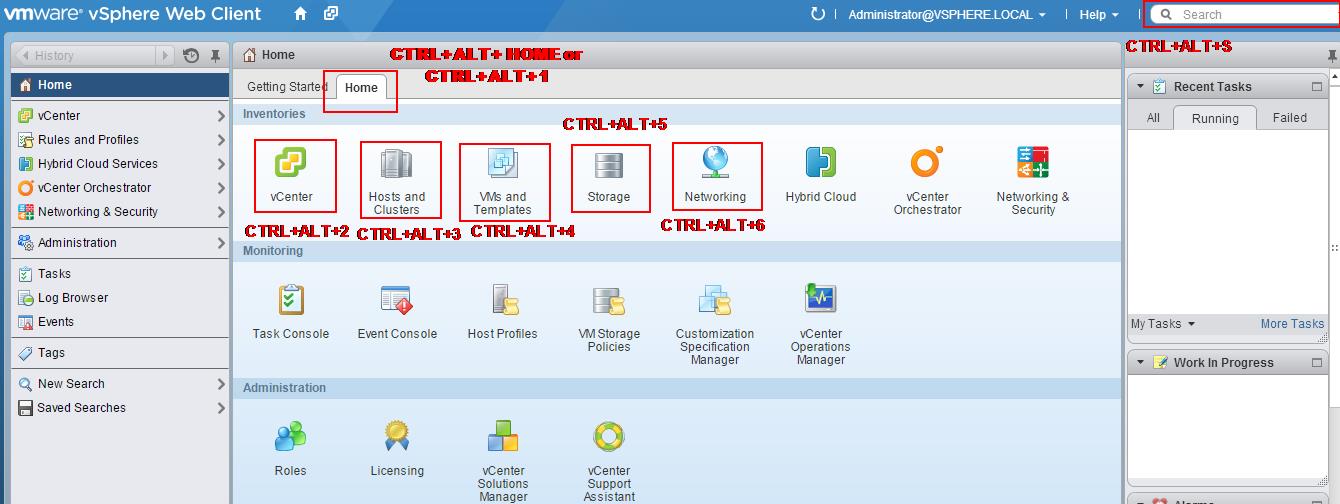
Almost everyone will be interesting to learn the shortcuts of your day to day tasks. This post is going ot list few of the Keyboard shortcuts of vSphere Web Client.  I verified the key board shortcuts of vSphere Web Client and it is really nice to have shortcuts which move towards different inventory items in vSphere Web Client. I believe it helps to switch between inventory items in Web client simply by Keyboard shortcuts without your Mouse clicks. vSphere Web Client - ShortcutsBelow are the list of Keyboard Combination and action related to the keyboard combination. Try to remember the shortcuts which helps to switch quickly between vSphere Web Client.

Keyboard CombinationAction
Ctrl+Alt+Home OR Ctrl+Alt+1
Home Screen
Ctrl+Alt+2
Virtual Infrastructure Inventory
Ctrl+Alt+3
Hosts and Clusters Inventory
Ctrl+Alt+4
VMs and Templates Inventory
Ctrl+Alt+5
Datastores and Datastore Clusters Inventory
Ctrl+Alt+6
Networking Inventory
Ctrl+Alt+s
Inventory Search
I hope this is informative for you. Thanks for Reading !!!. Be Social and share it in social media, if you feel worth sharing it.

vCloud Automation Center (vCAC 6.0) Installation Part 2 – Components of vCAC

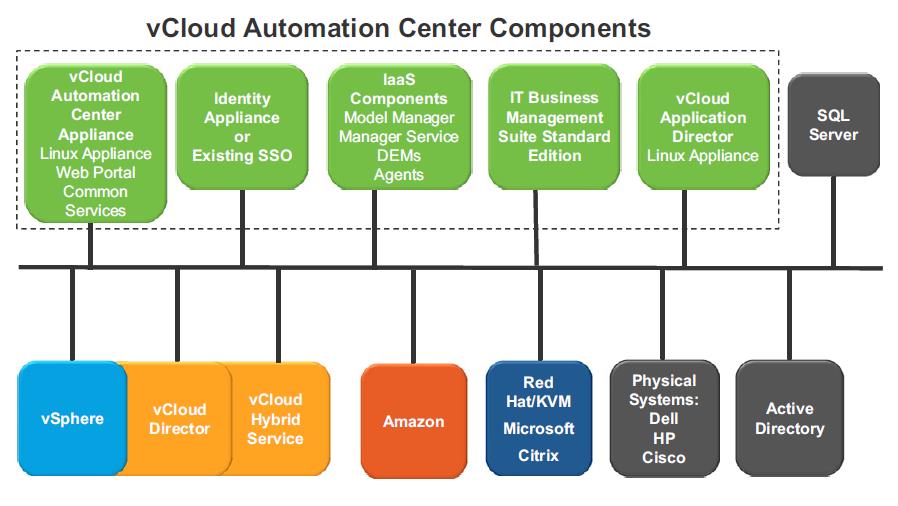
vCloud Automation Center vCAC 6.0 required 3 important components. We should install and configure the below 3 components  and its sub components properly to make use of vCAC website to provision and manage the cloud services along with authoring, administration and governance. ITBM and vCloud Application Director are add-on optional components. ITBM(IT Business Management) helps you to examine the financial data of your infrastructure. vCloud Application Director delivers the application services.

vCAC Components-1
Graphic Thanks to VMware.com
It should be installed and configured in the below order:
1.Identity Appliance – The Identity Appliance is a pre-configured virtual appliance that provides single sign-on for vCloud Automation Center. It is delivered as an open virtualization format (OVF) template. You can also use the SSO services from VMware vCenter Deployment If you are running vSphere 5.5 Update 1
2. vCloud Automation Center Appliance – The vCloud Automation Center Appliance is a pre-configured virtual appliance(OVF) that deploys the vCloud Automation Center Appliance server. It provides the Single portal for self-service provisioning and management of cloud services , as well as authoring,administration and governance. For High Availbality of Portal,you can deploy multiple instances of vCloud Automation Center appliance behind Load balancers
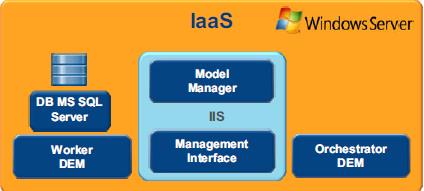
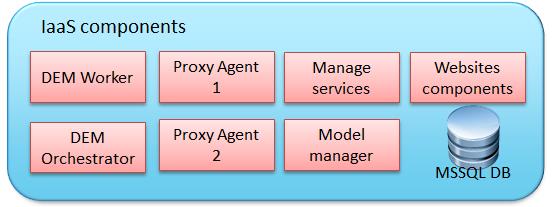
3Iaas Components Server (Should be installed on Windows Server and MS SQL Database is Mandatory) : Infrastructure as a Service (Iaas)enables the rapid modeling and provisioning of servers and desktops across virtual and physical,private and public, or hybrid cloud infrastructures. Iaas Components of vCAC includes multiple component:
Iaas Componenets-1
 Graphic Thanks to VMware.com
  • IaaS Website
  • Distributed Execution Managers(DEM)
  • Agents
  • Model Manager
  • Manager Service
  • Database
IaaS Website : provides the infrastructure administration and service authoring capabilities to the vCloud Automation Center console. The Website component communicates with the Model Manager, which provides it with updates from the Distributed Execution Manager (DEM), proxy agents and database.
Model Manager : The Model Manager communicates and integrates with external systems and databases. Models included in the Model Manager implement business logic that is executed by a DEM. The ModelManager provides services and utilities for persisting, versioning,securing, and distributing model elements. The Model Manager communicates with a Microsoft SQL Server database, the DEMs, and the console Web site.
Iaas Componenets-2Graphic Thanks to VMwareMine.com
Distributed Execution Managers :DEM executes the business logic of custom models, interacting with the IaaS database andexternal databases.
Proxy agents – virtualization, integration and WMI agents that communicate with infrastructure resources
DEM instances can be deployed in one of two forms:
DEM Orchestrator
  • • Preprocesses workflows, schedules workflows, and monitors DEM Worker instances.
  • • Only one DEM Orchestrator is active at a given time. A standby should be deployed for redundancy.
DEM Worker
  • • Communicates with the external systems
  • • Responsible for executing workflows
Manager Service : The Manager Service coordinates communication between agents,the IaaS database, Active Directory (or LDAP), and SMTP. The Manager Service communicates with the console Web site through the Model Manager.
Agents: Agents, like DEMs, are used to integrate vCloud Automation Center with external systems:
  • Virtualization proxy agents are used to collect data from and provision virtual machines on virtualization hosts, for example, a Hyper-V agent,a vSphere agent, or a Xen agent.
  • Integration agents provide vCloud Automation Center integration with virtual desktop systems, for example, an EPI Windows PowerShell agent, or a VDI Windows PowerShell agent.
  • Windows Management Instrumentation agents enable data collection from Windows machines managed by vCloud Automation Center.

Does VMware Products are affected by “Shellshock” Bash Vulnerability ?

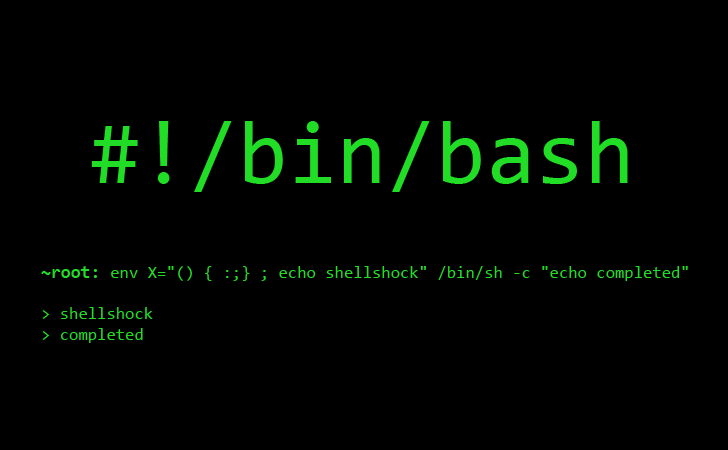
You might have heard above the Bash ShellShock Vulnerability from few days back. It is really more vulnerable than Heartbleed because Heartbleed was all about sniffing the system memory but Shellshock has opened the door so widely by allowing attackers can take the system control remotely. Millions of computers are using bash shell (command interpreter ). New security flaw has been found on bash(Bash Code Injection Vulnerability (CVE-2014-6271 & CVE-2014-7169) BASH(Bourne-Again SHell) is the default shell in all the Linux flavors(Redhat Linux,Open SUSE,Ubuntu etc.. Some of the other operating systems also shipped with bash shell but not a default shell. Almost all the vendors are in process of releasing the Patches for the Bash ShellShock vulnerability. As It’s already a question raised whether VMware Products are affected?. Please find the update from VMware about the Bash Code (ShellShock) Injection Vulnerability.

bash-shellshock

VMware Products:

  • vSphere ESXi/ESX Hypervisor

    ESXi 4.0, 4.1, 5.0, 5.1, and 5.5 are not affected because these versions use the Ash shell (through busybox), which is not affected by the vulnerability reported for the Bash shell.
    ESX 4.0 and 4.1 have a vulnerable version of the Bash shell.
    Note: After careful consideration, VMware will make VMware ESX 4.0 and 4.1 security patches available for the Bash Shell vulnerability.  This security patch release is an exception to the existing VMware lifecycle policy. VMware is making this exception because of the reported critical severity of the Bash vulnerability and because the product passed the end of general support within the last four months.  We encourage you to upgrade to our most current releases. The VMware Global Services teams are available to assist you in any way.
  • Products that run on Windows

    Windows-based products, including all versions of vCenter Server running on Windows, are not affected.
  • Products that are shipped as a virtual appliance or as an appliance

    The (virtual) appliances listed below ship with an affected version of Bash. While VMware has not demonstrated that the Bash vulnerability can be leveraged on these appliances, VMware will take the cautionary measure of re-releasing them.
    VMware (Virtual) Appliances
    • EVO:RAIL 1.x
    • Horizon DaaS Platform 6.x
    • Horizon Workspace 1.x, 2.0
    • IT Business Management Suite 1.x
    • NSX for Multi-Hypervisor 4.x
    • NSX for vSphere 6.x
    • NVP 3.x
    • vCenter Chargeback 2.x
    • vCenter Hyperic Server 5.x
    • vCenter Infrastructure Navigator 5.x
    • vCenter Log Insight 1.0, 2.0
    • vCenter Operations Manager 5.x
    • vCenter Orchestrator Appliance 4.x, 5.x
    • vCenter Server Appliance 5.x
    • vCenter Support Assistant 5.x
    • vCloud Automation Center 6.x Note: vCloud Automation Center 5.x is not a virtual appliance
    • vCloud Automation Center Application Services 6.x
    • vCloud Connector 2.x
    • vCloud Networking and Security 5.x
    • vCloud Usage Meter 3.x
    • vFabric Application Director 5.x, 6.x
    • vFabric Postgres 9.x
    • Viewplanner 3.x
    • VMware Application Dependency Planner
    • VMware HealthAnalyzer 5.x
    • VMware Studio 2.x
    • VMware TAM Data Manager
    • VMware Workbench 3.x
    • vSphere App HA 1.x
    • vSphere Big Data Extensions 1.x, 2.x
    • vSphere Data Protection 5.x
    • vSphere Management Assistant 5.x
    • vSphere Replication 5.x
    • vSphere Storage Appliance 5.x
    Important: VMware encourages restricting access to appliances through firewall rules and other network layer controls to only trusted IP addresses. This measure will greatly reduce any risk to these appliances.
  • Products that run on Linux, Android, Mac OS or iOS (excluding virtual appliances)
    Products that run on Linux, Android, Mac OS or iOS (excluding virtual appliances) might use the Bash shell that is part of the operating system. In case the operating system has a vulnerable version of Bash, the Bash security vulnerability might be exploited through the product. VMware recommends that customers contact their operating system vendor for a patch.Examples of products in this category include VMware Workstation, VMware Fusion, and AirWatch MDM software.
For more information, Please take a look at the VMware KB Article 2090740. I hope this is really informative for you. Stay tuned to get more information about the patch release on Bash Vulnerability from affected products. I hope this is informative for you. Thanks for Reading!!. Be Social and share it in social media, if you feel worth sharing it.

Thursday, 25 December 2014

vCloud Automation Center (vCAC 6.0) Installation Part 1 – Overview of vCAC


In this Modern Enterprise environment, Datacenters are occupied by hardware and software components from multiple vendors. Even some companies have hardware from multiple vendors like HP, DELL,Cisco etc and even mutli vendor hypervisors like vSphere, Hyper-V, Cirtix ZEN, Redhat KVM. How do you manage and provision using all this platform. It is real pain of using multiple admin portals to manage and provision.


vCloud Automation Center provides a secure portal where authorized administrators, developers or business users can request new IT services and manage specific cloud and IT resources, while ensuring compliance with business policies. Requests for IT service, including infrastructure, applications, desktops,and many others, are processed through a common service catalog to provide a consistent user experience. VMware vCloud Automation Center™ is a cloud management platform that reduces the complexity of provisioning virtual, cloud,and physical machines. VMware vCloud Automation Center (vCAC)™ is used to create and manage a multivendor cloud infrastructure.  Below are the inbuilt  endpoints which are available as part of vCAC 6.0:
Hardware:
  • HP
  • Dell
  • Cisco
Hypervisors:
  • VMware vSphere
  • Microsoft Hyper-V
  • Citrix Xen Server
  • Redhat KVM
Cloud Platforms:
  • vCloud Director
  • vCloud Hybrid Service
  • Amazon Web Services(AWS)
  • OpenStack
  • Windows Azure
Orchestration
  • VMware Orchestrator
Storage Endpoint:
  • Netapp ONTAP
Application Endpoint:
  • vCloud APP Director
Apart from the above list, You will be able to manage various custom endpoints like Active directory. vCloud Automation Center enables IT administrators to extend out-of-the-box capabilities. IT administrators can either integrate these capabilities with existing tools and infrastructure or new IT services by leveraging VMware vCenter Orchestrator library workflows and partner-provided plug-ins.

Graphic Thanks to VMware.com
vCloud Automation Center accelerates the deployment and management of applications and compute services, thereby improving business agility and operational efficiency. The following capabilities empower IT to quickly demonstrate the value of deploying an automated, on-demand cloud infrastructure:
Comprehensive Purpose-Built Functionality
vCloud Automation Center is a purpose-built, enterprise-proven solution for the delivery and ongoing management of private and hybrid cloud services, based on a broad range of deployment use cases from the world’s most demanding environments.
Personalized, Business-Aware Governance
Enable IT administrators to apply their own way of doing business to the cloud without changing organizational processes or policies. Enterprises gain the flexibility needed for business units to have different service levels, policies and automation processes, as appropriate for their needs.
Provision and Manage Application Services
Accelerate application deployment by streamlining the deployment process and by eliminating duplication of work using reusable components and blueprints.
Infrastructure Delivery and Life-Cycle Management
Automates the end-to-end deployment of multi-vendor infrastructure, breaking down internal organizational silos that slow down IT service delivery.
Extensible by Design
vCloud Automation Center provides a full spectrum of extensibility options that empower IT personnel to enable, adapt and extend their cloud to work within their existing IT infrastructure and processes, thereby eliminating expensive service engagements while reducing risk.


Graphic Thanks to VMware.com
Take a look at the VMware’s Official Video “Introduction to vCloud Automation Center 6.0″

Thursday, 18 December 2014

What is the difference between the vSphere ESX and ESXi architectures?

VMware ESX and ESXi are both bare metal hypervisor architectures that install directly on the server hardware.
Although neither hypervisor architectures relies on an OS for resource management, the vSphere ESX architecture relied on a Linux operating system, called the Console OS (COS) or service console, to perform two management functions: executing scripts and installing third-party agents for hardware monitoring, backup or systems management.
In the vSphere ESXi architecture, the service console has been removed. The smaller code base of vSphere ESXi represents a smaller “attack surface” and less code to patch, improving reliability and security.

What is a Hypervisor

It is a program that allows multiple operating systems to share a single hardware host. Each operating system appears to have the host's processor, memory, and other resources all to itself. However, the hypervisor is actually controlling the host processor and resources, allocating what is needed to each operating system in turn and making sure that the guest operating systems (called virtual machines) cannot disrupt each other.


What is the hardware version used in VMware ESXi 5.5

Version 10

Below is the table showing the different version of hardware used in different VMware products along with their release version

Virtual Hardware Version
Products
10
ESXi 5.5, Fusion 6.x, Workstation 10.x, Player 6.x
9
ESXi 5.1, Fusion 5.x, Workstation 9.x, Player 5.x
8
ESXi 5.0, Fusion 4.x, Workstation 8.x, Player 4.x
7
ESXi/ESX 4.x, Fusion 2.x/3.x Workstation 6.5.x/7.x,Player 3.x
6
Workstation 6.0.x
4
ACE 2.x, ESX 3.x, Fusion 1.x, Player 2.x
3 and 4
ACE 1.x, Player 1.x, Server 1.x, Workstation 5.x, Workstation 4.x
3
ESX 2.x, GSX Server 3.x

Friday, 5 December 2014

Recover data from VMFS/VMware disks

Vmfs Recovery offers a safe, easy way to recover information stored on VMFS-formatted disks. Like any other storage media, VMware disks can get damaged by software and hardware faults. Bad blocks and physical corruption of hard drives storing the virtual disk images can also cause corruption to VMware images.

Recover Information from Healthy and Damaged VMFS Drives

Vmfs Recovery can recover data from healthy and corrupted virtual disk images used by VMware vSphere 5, ESX/ESXi VMware(R) ESX Server(tm) in fully automated mode. As VMware employs VMFS, its very own file system to store virtual machines, Vmfs Recovery works equally well in quick and full recovery modes.

Recover VMDK Disks from ESX Servers

Recovering VMDK images from ESX servers is a two-step process. First, Vmfs Recovery will repair the ESX/ESXi storage to gain access to individual virtual PCs stores in these partitions. After that, individual virtual machines represented with their VMDK disks can be extracted, and a standard data recovery process can be launched.

Remote Recovery

Information is retrieved online over the network without the need to physically access the actual server hosting the virtual PCs. There’s absolutely no need to shut down the host computer or remove hard drives containing the virtual servers.

Recover VMware Partitions from Damaged Hard Drives and Faulty RAID Arrays

VMFS disks can be recovered from damaged, corrupted and inaccessible physical hard drives and RAID arrays, including corrupted RAIDs and broken arrays with or without the original RAID controller installed.

Fully Automated VMFS Recovery

VMFS disks can be recovered from damaged, corrupted and inaccessible physical hard drives and RAID arrays, including corrupted RAIDs and broken arrays with or without the original RAID controller installed.

What Can Be Recovered

  • VMDK images from healthy and corrupted VMFS disks created in all versions of ESX Server or VMware
  • VMFS drives stored on working or faulty RAID arrays, with or without the original RAID controller present
  • VMFS drives stored on corrupted and inaccessible hard drives
  • VMDK images stored in disks formatted by VMware(R) ESX Server(tm)

Compatibility

  • VMFS partitions created in VMware vSphere 5 and ESX/ESXi VMware(R) ESX Server(tm)
  • VMFS3 and VMFS5 support
  • Supports files up to 2TB
  • VMFS5 drives with more than 100,000 files
  • VMFS partitions up to 64TB
  • Unicode file names in VMFS5
  • VMFS drives stored on all types of RAID arrays including RAID JBOD, 0, 1, 1E, RAID 4, RAID 5, RAID 5R, 0+1 and 1+0
  • VMFS partitions stored on hardware and integrated RAID arrays
  • Runs in all versions of Windows 7, 2008 R1/R2, Vista/XP/2000

Features

  • Two modes of operation: quick and full recovery
  • Fully guided, step-by-step recovery wizard
  • Saves recovered files and folders on local or remote locations
  • Supports FTP upload and can burn recovered data onto CD & DVD discs
  • Can mount virtual disks to system as drive letters (will be accessible with Explorer and all other browsers and file utilities)
  • Recovers information bypassing Windows access restrictions
  • Supports long and international file names and folders with multiple sub-folders
  • Recovers VMDK images from corrupted VMFS partitions stored on corrupted RAID arrays with or without the original RAID controller
  • Supports all the features of Raid Recovery

Compatibility

Diskinternals Vmfs Recovery supports VMFS partitions created in VMware vSphere 5 and ESX/ESXi drives created in VMware(R) ESX Server(tm). Vmfs Recovery supports Windows 7 and 2008 Server R1/R2, as well as Windows 2000, XP, 2003 Server, and Windows Vista. All types of internal and external hard drives and RAID arrays are supported, with or without the original RAID controller.

VMware ESX – How to easily recreate a missing or corrupt VMX file.


Now you could manually recreate a missing or corrupt VMX file (restoring one from a backup would be the best solution) but a quick and easy way for recreating it is to create a new VM within the VMware Infrastructure Client (VIC) or via CLI/RCLI.  During the creation process point the new VM’s drives to the existing disk (VMDK) files of the server with the corrupt/missing VMX file.
Below are the basic steps for doing this via the VMware Infrastructure Client interface.
Before beginning to start the process to recreate the VMX file, if it exists, remove the VM from the VMware Infrastructure Clients inventory list (right click on the VM and select ‘Remove from Inventory’). Also if you are trying to replace a corrupted VMX file then rename (preferable option) or delete the offending VMX file.
First start the ‘New Virtual Machine Wizard’ and select a ‘Virtual Machine Configuration’ type of ‘Custom’. 
image
The next page of the wizard will ask for a ‘Name’ for the new VM.  Make sure the name you type in here matches the name of the directory on your VMFS partition that hosts the VM with the missing/corrupt VMX file. 
If you enter in a different name here the New Virtual Machine Wizard will create a directory of that name that will contain the VMX file (along with a couple of other files important to the running of the VM) whilst your disk (VMDK) file(s) could be located in another directory.  Although there are potentially situations where you may want to keep your disk and configuration files separate I would personally recommend keeping them all together to reduce the risk of any future confusion and accidental moves or deletions of these VM related files.
image 
The next screen of the Wizard asks for you to select the location of the datastore.  As mentioned above, in most situations it is best to select the same LUN/Disk on which the VMDK (disk) files are located.
image
Now proceed through the next few steps of the Wizard selecting and adjusting (if required) any of the VM configuration parameters (eg: Guest OS, number of virtual processors, memory, etc).
When you get to the ‘Select a Disk’ screen then select ‘Use an existing virtual virtual disk’ and select the primary VMDK boot disk file for the VM with the missing/corrupt VMX file. 
image
Proceed through the rest of the Wizard until you get to the ‘Ready to ‘Complete New Virtual Machine’ screen. At this point if you wish to add any additional secondary (eg: data) disks then check the ‘Edit the virtual machine settings before submitting’ box and add in any additional disks, NICs, etc.
image
Once complete then press the ‘Finish’ button.  Within the VMware Infrastructure Client interface you will now see the newly recreated VM back in the inventory list.
Using the ‘Datastore Browser’ navigate to the folder of VM and you should now see a freshly created VMX file.
vmxfile
You are now ready to start the VM with its new VMX file.  Good Luck!

Thursday, 27 November 2014

sss

Creating a DSN in the ODBC Data Source Administrator


If you are using Microsoft Windows, you must first create and configure the ODBC connection to your data source by means of the ODBC Data Source Administrator before you can create the ODBC source system in the PCo Management Console. To do so, you must create a Data Source Name (DSN) for the data source in the ODBC Data Source Administrator.

Procedure

  1. You can start the ODBC Data Source Administrator from the start menu under   Run  odbcad32.exe  .
    Note Note
    If you are using a 64-bit version of Windows, you must ensure that you are using the ODBC Data Source Administrator in the 32-bit version. A 32-bit version and a 64-bit version of the ODBC Data Source Administrator are available in the 64-bit version of Windows7. In this Windows version, you start the 64-bit version of the ODBC Data Source Administrator from the start menu with Run. The System Data Source Name entries that are created using the 64-bit version are not taken into account by PCo, however.
    The valid 32-bit version is located in the subfolder SysWOW64 in the Windows directory; for example, under C:\Windows\SysWOW64\odbcad32.exe.
    If you create User Data Source Name entries instead of System Data Source Name entries, you can also use the 64-bit version of the ODBC Data Source Administrator.
    After the odbcad32.exe is started, the ODBC Data Source Administrator dialog box is displayed.
  2. You must add a Data Source Name for the database that you want to use as the data source. The following types are available:
    • User DSN
      On the User DSN tab, you can add a user-specific Data Source Name (DSN) for the data source of your choice. If you are using a User DSN, a connection is only created for the Windows user who is logged on and only that user can see and use this connection.
    • System DSN
      You can add an entry for the data source of your choice on the System DSN tab. All users who log on to the system can then see and use the System DSN.
    Note Note
    You can create a User DSN and a System DSN with the same name. In this case, only the User DSNis displayed in the PCo Management Console; the System DSN with the same name is not displayed. For that reason, you must not use the same name for a User DSN and a System DSN. Duplicated names are not possible on the User DSN or System DSN tabs. The ODBC Data Source Administratorissues a message if an attempt is made to use duplicated names.
  3. You have to select an ODBC driver for the data source. The ODBC drivers are provided by each database provider. For that reason, the dialog for configuring the ODBC connection can be built up differently.

Example

Example for creating a System DSN for an Excel file that you want PCo to use as the data source:
  1. In the ODBC Data Source Administrator, click the System DSN tab.
  2. Choose the Add pushbutton.
    The Create New Data Source dialog box appears.
  3. Choose the driver; for example, Microsoft Excel Driver (*.xls).
    The ODBC Microsoft Excel Set Up dialog box appears.
  4. Enter the following data:
    • Data Source Name
      Here you can enter a name of your choice for the file that you want to use as a data source. This name is displayed later in PCo on the ODBC Database Connection tab with the addition (System DSN).
    • Description
      You can enter a short description here.
    • Version
      Choose the Excel version of your file.
  5. Choose the Select Workbook pushbutton to select the directory and the Excel file you want.
  6. Confirm by choosing OK.
    The System DSN is now displayed in the ODBC Data Source Administrator and in the PCo Management Console on the ODBC Database Connection tab.